The best thing my mum could have done during the day when we were all at school, was bake a chocolate cake. We would know if she’d made one as the cake tin would be sitting on the counter when we got home; the baking parchment sticking out over the edges, and the beaters from the mixer still covered in chocolate buttercream. None of us were sure whether to dive into the tin or grab a beater and lick it.
I can remember feeling the weight of the cake as I checked the thickness of the buttercream in the middle (hoping mum hadn’t had a fit of meanness when doing that bit) and the anticipation as we poured glasses of ice-cold milk. Having chocolate cake with a glass of milk – something I allow myself only occasionally these days – is the nearest you can get to eating happiness. The cake is rich; the milk cleanses; the satisfaction is immense.
Chocolate cake was the first cake I learned to make. Nearly everything I know about dealing with chocolate I learned through trial and error. My mum taught me to melt squares in a bowl set over a pan of gently simmering water, but I realised, after successive disasters, how careful you have to be when dealing with it. The bowl shouldn’t even touch the water over which you’re melting your chocolate (it will melt too quickly). Even steam can turn chocolate into an unworkable lump as water combines with the dry cocoa solids. If you need to add liquid, such as cream, you must add a large enough quantity to make the solids form a solution. If you have to add small amounts of liquid – a few spoonfuls of alcohol, for example – you must add it before the chocolate melts.
Overheating chocolate – because I’m rushing – is the crime I most often commit. Overheat your melting squares and the mixture will turn thick and ‘muddy’.
If you do overheat chocolate, immediately transfer it to a new bowl and stir in a handful of chopped chocolate. Beat like mad: the additional chocolate should reduce the temperature and rescue it sufficiently to make it usable in a cake. Choosing good chocolate for cooking (a minimum of 70% cocoa solids) is important, but patience is also essential. – @DianaHenryFood
Makes: 20
Prep: 50 Minutes + chilling
Cook: 30 Minutes
Easy
Ingredients
2 tbsp instant espresso powder
225 grams (1 cup) butter, softened at room temperature
85 grams (1/4 cup) caster (baker’s) sugar
225 grams (1 cup) plain flour, plus extra for dusting
75 grams (1/2 cup) rice flour
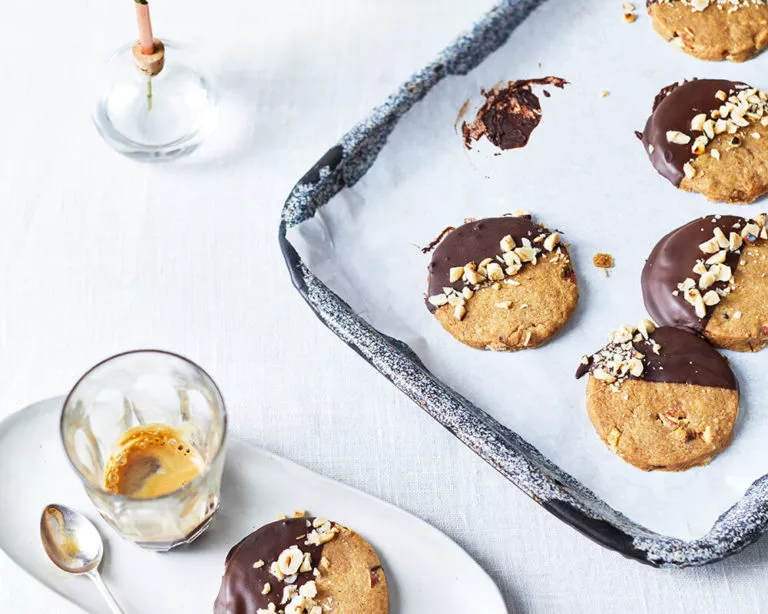
75 grams (1/2 cup) unblanched hazelnuts, halved
To decorate
150 grams (2/3 cup) of 70% dark chocolate, broken into chunks
75 grams (1/2 cup) blanched hazelnuts, toasted and very roughly chopped (leave some pieces quite large)
Directions
1. Mix the espresso powder with 1 tsp hot water to form a paste (you’ll think it isn’t enough water but it is – don’t add more otherwise it’ll be too watery). Set aside.
2. Beat the butter and sugar until soft and blended, then beat in the coffee mixture. Don’t overbeat the mixture as you don’t want to incorporate too much air. (If the coffee isn’t completely incorporated, don’t worry – it will be once you add the flours).
3. Sift together the flours and add them to the butter in three lots, mixing in with a wooden spoon and, eventually, your hands. Bring together into a ball, then transfer to a lightly floured surface and quickly knead in the hazelnuts. Don’t overdo this – you don’t want the butter to get too warm. Press the dough into a circle, wrap it in cling film and put in the fridge for about 40 mins.
4. Roll out the dough on a lightly floured surface to 0.75cm (0.3 inches) thick. Cut out circles about 6cm (2.4 inches) across with a biscuit cutter and put the circles on a non-stick baking sheet (or two baking sheets, depending on their size). Re-roll the dough as you need to, but try not to do this too often. Put the baking sheets in the coldest part of the fridge and leave them for about 45 mins. Heat oven to 160C (320F)/140C (284F) fan/gas 3.
5. Bake the shortbread for 20 mins, or until the top is just firm when you press it with your index finger. Take out of the oven and leave on the baking sheets to cool for a while (it is very fragile when hot), then transfer to a wire rack to cool completely.
6. Melt the chocolate in a bowl set over a pan of simmering water, then remove the bowl and leave to cool a little and firm up somewhat. Dip each piece of shortbread halfway in the melted chocolate, then put on a sheet of baking parchment. Sprinkle the toasted hazelnuts on the chocolate half and leave to set completely. Will keep for 4 days in an airtight tin.
Per Shortbread:
259 kcals
18g fat
9g saturates
19g carbs
6g sugars
2g fiber
3g protein
0.2g salt
Recipe Credit: BBC Good Food (Measurement and Temperature conversions added where possible)
